Database: your new buddy!
As a scientist you are used to work with many software tools and often you need to write your own programs because the ones available do not really match your needs. Databases are not so common among scientists, we do not really understand why, but nevertheless their strength is beyond question.
The demonstration of the power and usefulness of a database assisted analysis framework will become clear and evident during our tutorial where we will build a small analytical experiment from scratch one step at the time.
For the time being, let us concentrate a bit on the technical aspect without delving too deeply into the specifics.
Database: one name, many implementations
Database is really a generic term and, from a technical point of view, one should try to be more specific and define better what kind of database we are talking about. We are not just referring to the brand or the producing software house: there are indeed different database architectures, but the one best suited for our application is the relational database, where each entity can be related directly to one or more other entities. You can read about relational databases on wikipedia for example, and if you find it too complicated, have a look at this shorter and easier version.
The software market is full of relational databases, from the very common MySQL to the very famous ORACLE, passing through the open source PostgreSQL to finish with SQLite the simplest and most used database in the world. As you may have guessed from their names, they are all sharing the same query language (SQL: structured query language), making it rather simple to have an abstract interface, that is to say a layer in between the user and the actual database that allows your code to work in the same way irrespectively of the specific implementation.
Peewee: a simple and small ORM
Of course there are also lots of different abstract interfaces, some more performing than the others. We have selected peewee, because it is lightweight, easy to understand and to use, and it works with several different implementations.
peewee is a ORM (promised this is the last acronym for this page!), it is to say an object relational mappers, or in simpler words a smart way to connect the tables in your database with python classes in your code. Have a look at this interesting article for a more detailed explanation.
peewee offers at least three different backends: SQLite, MySQL and PostgreSQL. If the size of your project is small to medium and the analysis is mainly performed on a single computer, then we recommend SQLite: the entire database will be living in a single file on your disc, eliminating the need for IT experts to set up a database server. If you are aiming for a much bigger project with distributed computing power, then the other two choices are probably equally good and your local IT helpdesk may suggest you what is best for your configuration and the available IT infrastructure. As you see, MAFw is always offering you a tailored solution!
Now, take a short break from this page, move to the peewee documentation and read the Quickstart section before coming back here.
Database drivers
If you have installed MAFw via pip without specifying the all-db optional features, then your python environment is very likely missing the python drivers to connect to MySQL and PostgreSQL. This is not a bug, but more a feature, because MAFw gives you the freedom to select the database implementation that fits your needs. Sqlite is natively supported by python, so you do not need to install anything extra, but if you want to use MySQL, PostgreSQL or any other DB supported by peewee than it is your responsibility to install in your environment the proper driver. Here you can find a list of DB driver compatible with peewee.
If you want, you can install MAFw adding the all-db optional feature and in this way the standard MySQL and PostgreSQL drivers will also be installed.
One class for each table
As mentioned before, the goal of an ORM is to establish a link between a database table and a python class. You can use the class to retrieve existing rows or to add new ones, and as always, you do not need take care of the boring parts, like establishing the connection, creating the table and so on, because this is the task of MAFw and we do it gladly for you!
Let us have a look together to the following example. We want a processor that lists recursively all files starting from a given directory and adds the filenames and the file hash digests to a table in the database.
Let us start with some imports
 1import datetime
 2from pathlib import Path
 3
 4from peewee import DateTimeField, IntegerField, TextField
 5
 6import mafw.processor
 7from mafw.db.db_configurations import db_scheme, default_conf
 8from mafw.db.db_model import MAFwBaseModel
 9from mafw.decorators import database_required
10from mafw.tools.file_tools import file_checksum
The crucial one is at line 8, where we import MAFwBaseModel that is the base model for all the tables we want to handle with MAFw. Your tables must inherit from that one, if you want the Processor to take care of handling the link between the class and the table in the database.
At line 4, we import some classes from peewee, that will define the columns in our model class and consequently in our DB table.
Now let us create the model class for our table of files.
1class File(MAFwBaseModel):
2    """The Model class representing the table in the database"""
3
4    filename = TextField(primary_key=True)
5    digest = TextField()
6    creation_date = DateTimeField()
7    file_size = IntegerField()
Note
A much better implementation of a similar class will be given later on demonstrating the power of custom defined fields.
As you can see the class definition is extremely simple. We define a class attribute for each of the columns we want to have in the table and we can choose the field type from a long list of available ones or we can even easily implement our owns. The role of a field is to adapt the type of the column from the native python type to the native database type and vice versa.
Our table will have just four columns, but you can have as many as you like. We will have one text field with the full filename, another text containing the hexadecimal hashlib digest of the file, the creation date for which we will use a datetime field, and finally a file_size field of integer type. We will be using the filename column as a primary key, because there cannot be two files with the same filename. On the contrary, there might be two identical files having the same hash but different filenames. According to many good database experts, using a not numeric primary key is not a good practice, but for our small example it is very practical.
If you do not specify any primary key, the ORM will add an additional number auto-incrementing column for this purpose. If you want to specify multiple primary keys, this is what you should do. If you want to create a model without a primary key, here is what you need to do.
The ORM will define the actual name of the table in the database and the column names. You do not need to worry about this!
And now comes the processor that will be doing the real work, it is to say, filling the File table.
 1@database_required
 2class FillFileTableProcessor(mafw.processor.Processor):
 3    """Processor to fill a table with the content of a directory"""
 4
 5    root_folder: Path = mafw.processor.ActiveParameter(
 6        'root_folder', default=Path.cwd(), help_doc='The root folder for the file listing'
 7    )
 8
 9    def __init__(self, *args, **kwargs):
10        """
11        Constructor parameter:
12
13        :param root_folder: ActiveParameter corresponding to the directory from
14            where to start the recursive search
15        :type root_folder: Path, Optional
16        """
17        super().__init__(*args, **kwargs)
18        self.data: list[dict] = []
19
20    def format_progress_message(self):
21        self.progress_message = f'Upserting {self.item.name}'
22
23    def start(self):
24        """Starts the execution.
25
26        Be sure that the table corresponding to the File model exists.
27        It it does already exists, it is not a problem.
28        """
29        super().start()
30        self.database.create_tables((File,))
31
32    def get_items(self) -> list[Path]:
33        """Retrieves the list of files.
34
35        Insert or update the files from the root folder to the database
36
37        :return: The list of full filename
38        :rtype: list[Path]
39        """
40        file_list = []
41        if self.root_folder.is_file():
42            return [self.root_folder]
43        elif self.root_folder.is_dir():
44            for f in self.root_folder.glob('**/*'):
45                if f.is_file():
46                    file_list.append(f)
47        else:  # root_file is a glob
48            for f in self.root_folder.parent.glob(self.root_folder.name):
49                file_list.append(f)
50        return file_list
51
52    def process(self):
53        """Add all information to the data list"""
54        self.data.append(
55            dict(
56                filename=str(self.item),
57                digest=file_checksum(self.item),
58                file_size=self.item.stat().st_size,
59                creation_date=datetime.datetime.fromtimestamp(self.item.stat().st_mtime),
60            )
61        )
62
63    def finish(self):
64        """Transfers all the data to the File table via an atomic transaction."""
65        with self.database.atomic():
66            File.insert_many(self.data).on_conflict_replace().execute()
67        super().finish()
The first thing to notice is at line 1, where we used the decorator database_required(). The use of this decorator is actually not compulsory, its goal is to raise an exception if the user tries to execute the processor without having a properly initialized database.
At line 30, in the start method we ask the database to create the table corresponding to our File model. If the table already exists, then nothing will happen.
In the process method we will store all the information we have collected from the files into a list and we interact with the database only in the finish method. At line 65, we use a context manager to create an atomic transaction and then, at line 66, we insert in the File all our entries and in case a row with the same primary key exists, then it is replaced.
We could have used several different insert approaches, here below are few examples:
# create an instance of File with all fields initialized
new_file = File(filename=str(self.item),
              digest=file_checksum(self.item),
              file_size=self.item.stat().st_size,
              creation_date=datetime.datetime.fromtimestamp(self.item.stat().st_mtime))
new_file.save() # new_file is now stored in the database

# create an instance of File and add the fields later
new_file = File()
new_file.filename = str(self.item)
new_file.digest = file_checksum(self.item)
new_file.file_size = self.item.stat().st_size
new_file.creation_data = datetime.datetime.fromtimestamp(self.item.stat().st_mtime)
new_file.save()

# create and insert directly
new_file = File.create(filename=str(self.item),
              digest=file_checksum(self.item),
              file_size=self.item.stat().st_size,
              creation_date=datetime.datetime.fromtimestamp(self.item.stat().st_mtime))
The approach to follow depends on various factor. Keep in mind that peewee operates by default in auto commit mode, meaning that for each database interaction, it creates a transaction to do the operation and it closes afterwards.
To be more performant from the database point of view, especially when you have several operations that can be grouped together, you can create an atomic transaction where the ORM will open one transaction only to perform all the required operations.
What we have done in the finish method is actually known as an upsert. It means that we will be inserting new items or updating them if they exist already.
Ready, go!
We have prepared the code, now we can try to run it. We can do it directly from a script
if __name__ == '__main__':
    database_conf = default_conf['sqlite']
    database_conf['URL'] = db_scheme['sqlite'] + str( Path.cwd() / Path('test.db'))

    db_proc = FillFileTableProcessor(root_folder =r'C:\Users\bulghao\Documents\autorad-analysis\EdgeTrimming',
                                     database_conf=database_conf)

    db_proc.execute()
or in a more elegant way we can use the mafw app to run, but first we need to generate the proper steering file.
c:\> mafw steering db-processor.toml
A generic steering file has been saved in db-processor.toml.
Open it in your favourite text editor, change the processors_to_run list and save it.

To execute it launch: mafw run db-processor.toml.
 1# MAFw steering file generated on 2024-11-24 22:13:38.248423
 2
 3# uncomment the line below and insert the processors you want to run from the available processor list
 4processors_to_run = ["FillFileTableProcessor"]
 5
 6# customise the name of the analysis
 7analysis_name = "mafw analysis"
 8analysis_description = "Using the DB"
 9available_processors = ["AccumulatorProcessor", "GaussAdder", "ModifyLoopProcessor", "FillFileTableProcessor", "PrimeFinder"]
10
11[DBConfiguration]
12URL = "sqlite:///file-db.db" # Change the protocol depending on the DB type. Update this file to the path of your DB.
13
14[DBConfiguration.parameters.sqlite]
15# you do not need to add this empty table, but it does not hurt and
16# it makes the file easier to read.
17
18[DBConfiguration.parameters.sqlite.pragmas] # Leave these default values, unless you know what you are doing!
19journal_mode = "wal"
20cache_size = -64000
21foreign_keys = 1
22synchronous = 0
23
24[FillFileTableProcessor] # Processor to fill a table with the content of a directory
25root_folder = 'C:\Users\bulghao\PycharmProjects\mafw' # The root folder for the file listing
26
27[UserInterface] # Specify UI options
28interface = "rich" # Default "rich", backup "console"
If you look at the steering file, you will notice that there is a DBConfiguration section, where we define the most important variable, it is to say the DB URL. This is not only specifying where the database can be found, but also the actual implementation of the database. In this case, it will be a sqlite database located in the file file-db.db inside the current directory.
There is also an additional sub table, named parameters.sqlite.pragmas, containing advanced options for the sqlite DB. Unless you really know what you are doing, otherwise, you should leave them as they are.
In the following Configuring other types of databases, we will cover the case you want to use another DB implementation different from SQLite.
In the FillFileTableProcessor you can find the standard configuration of its processor parameters.
Now we are really ready to run our first DB processor and with a bit of luck, you should get your DB created and filled.
How to check the content of a DB?
There are several tools serving this purpose. One of those is dbeaver that works with all kind of databases offering an open source community version that you can download and install.
Configuring other types of databases
In the previous example, we have seen how to configure a simple SQLite database. For this database, you just need to indicate in the URL field the path on the local disc where the database file is stored.
SQLite does not require any user name nor password and there are no other fields to be provided. Nevertheless, it is
worth adding the previously mentioned parameters.sqlite.pragmas section to assure the best functionality of peewee.
In the case of MySQL and PostgreSQL, the URL should point to the server where the database is running. This could be
the localhost but also any other network destination. Along with the server destination, you need also to specify the
port and the database name; authentication is now provided through a dedicated DBConfiguration.authentication
subtable so transport, authentication, and backend-specific parameters stay separate.
The authentication subtable supports three methods:
env: the
usernameandpasswordentries are the environment variable names to resolve at runtime. This option is very convenient for remote execution on a batch system because you can easily and securely define your connection credentials in environmental variables.inline: the
usernameandpasswordvalues are stored directly in the steering file (not recommended). Use this with extreme care, because you risk to leak your credential by commiting the steering file to the git repository.file: the
passfileentry points to a password file. For MySQL this maps toread_default_file; for PostgreSQL this maps topassfile(and omitting it lets libpq use the default.pgpass). The file authentication is the most suited for local execution, because you just edit the password file according to the DB requirements and you are good to go without having to export environmental variables.
Have a look at the exemplary steering files with the corresponding configurations here below.
[DBConfiguration]
URL = "sqlite:///file-db.db" # change the filename to the absolute path of the db

[DBConfiguration.parameters.sqlite]

[DBConfiguration.parameters.sqlite.pragmas] # Leave these default values, unless you know what you are doing!
journal_mode = "wal"
cache_size = -64000
foreign_keys = 1
synchronous = 0
[DBConfiguration]
# Update the database server and the database name to reflect your configuration
URL = "postgresql://database-server:5432/database-name"

[DBConfiguration.authentication]
method = "file"
username = "username"
passfile = "~/.pgpass"

[DBConfiguration.parameters.postgresql]
Instruction on how to create a PostgreSQL password file are provided here. This is an example:
database-server:5432:database-name:username:password
[DBConfiguration]
# Update the database server and the database name to reflect your configuration
URL = "mysql://database-server:3306/database-name"

[DBConfiguration.authentication]
method = "file"
username = "username"
passfile = "~/.my.cnf"

[DBConfiguration.parameters.mysql]
Instruction on how to create a MySQL password file are provided here. This is an example:
[client]
user=username
password=password
host=database-server
Changing the DB URL
Instead of hard coding the database URL, you can use the environment variable expansion supported by MAFw steering files. This lets you keep one steering file and switch between local, testing, or production databases by exporting a different variable before running the analysis.
The advantages of using MAFwBaseModel
In the previous code snippets we have implemented our Model classes as sub-class of MAFwBaseModel. This is not just a detail because MAFwBaseModel is offering some embedded advantages compared to the base model class of peewee. In the following subsections we will explicitly describe them all. For additional details, you can also read the API documentation of MAFwBaseModel and of RegisteredMeta the meta class where all this magic is taking place.
Automatic join helper
MAFwBaseModel exposes join_dependent_models(), which returns a Select statement that already joins every foreign-key dependency declared on the model. Each related row is attached to the resulting instances via an attribute named _<field name>, mirroring the naming convention used in manual join_from chains (e.g. RawImage._grid). Processors can call this helper to avoid writing long join cascades and focus only on the filters coming from the steering file and any additional domain-specific conditions.
Example:
query = RawImage.join_dependent_models().where(RawImage.grid_id != 0)
query = query.where(self.filter_register.filter_all())
This utility is especially helpful when the input model links to multiple tables, because it automatically generates the dependencies’ JOIN clauses without forcing you to repeat the same boilerplate every time.
Automatic model registration
We will explain you the relevance of this point with an example.
Imagine that you have a processor that is performing some calculations; the processor can operate on real data or on simulated data following the same workflow, the only difference is that we will be taking input items from two different tables, one for real data and one for simulated data. Similarly we would like to save the output into two different tables.
The most convenient approach would be to set the input and output Models as processor parameters, but a Model is a python class and we could not provide this via our steering file. There we can imagine to provide a string representing the name of the corresponding DB table, but peewee is missing the capability to retrieve the Model class given the name of the corresponding DB table or the model name, the last possibility would be to build up a custom selection logic based on if/else blocks.
The automatic registration and the mafw_model_register are there exactly to fill this hole. When you define a new model class inheriting from MAFwBaseModel, this will be automatically added to model register and then you will be able to retrieve it using the ModelRegister.get_model() method [1].
Here is a little example to make it simpler.
1# file: db_model.py
2# this is the module where all our models are defined
3
4from peewee import IntegerField
5from mafw.db_model import MAFwBaseModel
6
7class MyRegisteredModel(MAFwBaseModel):
8    integer_num = IntegerField(primary_key=True)
 1# file: my_processor.py
 2# this it the module where the processors are defined
 3
 4from mafw.processor import Processor
 5from mafw.db.db_model import mafw_model_register
 6
 7import db_model.py
 8
 9class MyProcessor(Processor):
10    # put here all your definitions...
11    def get_items(self):
12        # we want to process all items in the input model.
13        input_model = mafw_model_register.get_model('my_registered_model')
14        return input_model.select()
In the my_processor.py file you can see how to retrieve a Model class from the register. You can use either the full table name or if you wish the Model name (MyRegisteredModel) as a key. It is important to notice line 7 where we import db_model with all our model definitions. This is necessary because the automatic registration occurs when the interpreter is processing the definition of a class inheriting from MAFwBaseModel. The imported module is actually not used in the processor, but we need to be sure that the interpreter has read the definition of the model. In a following section, you will see a smart method to avoid this useless import.
Exclude from automatic registration
There might be cases, not many to be honest, in which you want a Model class not to be registered. A typical example is the case of a Model class used in your project as a base for all your models. It makes no sense to have this abstract model in the registry because you will never use it.
If you want to prevent the automatic registration then you simply have to specify it in the model definition as in the following example:
1from mafw.db.db_model import MAFwBaseModel
2
3class MyBaseModel(MAFwBaseModel, do_not_register=True):
4    pass
5
6class MyConcreteModel(MyBaseModel):
7    pass
Have a look at the definition of MyBaseModel. Along with the specification of the base class, we provided as well the extra keyword argument do_not_register. In this example, MyBaseModel will not be registered in the mafw_model_register, while MyConcreteModel is.
Automatic import of db modules
Having the automatic registration is for sure a big step forward, something less for you to take care, but having to import the module with the model class definition is a bit annoying, in particular if your code is using a linter where unused_import (F401) are often automatically removed.
The idea is to use once again the plugin mechanism of MAFw to inform the runner (mafw), that the module including all the db models should be imported. This is how you can achieve this:
The register_db_model_modules is expected to return a list of module fully qualified module names. Those strings will be then automatically passed to the importlib.import_module function in order to be loaded. It is important that the string is properly formatted and the module is correctly spelled, otherwise MAFw will raise an ImportError.
Trigger support
The use of triggers and their advantages for an efficient and reliable data analysis will be discussed at length in the following chapter. Some special triggers can also be automatically generated as explained here.
Customizable table name
The default naming convention adopted by peewee is to transform the CamelCase model name is a snake_case table name. Unless you want to access the tables using low level SQL statements or from an external tool like dbeaver, then knowing the actual table name is not very important.
Peewee offers the possibility to customize the table names and MAFwBaseModel expand this even further, with the possibility to add a prefix, a suffix or both to the camel_case table name. This feature is very handy when you are handling a large database with several tens of tables. When browsing the database index from dbeaver, tables are normally sorted in alphabetical order and thus finding a specific table can be frustrating. You may want to prefix all the tables belonging to a specific part of your experiment with a given word, in order to have them all grouped together [2].
This is how:
from mafw.db.db_model import MAFwBaseModel

class SimulationModel(MAFwBaseModel, do_not_register=True):
    class Meta:
        prefix = 'simul'

class SimulationResult(SimulationModel):
    # put here your fields
    pass

class DataModel(MAFwBaseModel, do_not_register=True):
    class Meta:
        prefix = 'data'

class DataResult(DataModel):
    # put here your fields
    pass
In this example we have defined two base models (that are not registered automatically), one for simulation and one for real data results. In the Meta class definition of the two base models we have assigned a value to the attribute prefix. This attribute will be inherited by all their subclasses, so that the table name corresponding to SimulationResult will be simul_simulation_result. A similar effect can be obtained setting the suffix parameter.
See also
See also make_prefixed_suffixed_name() for more details on the naming convention.
Automatic table creation
In our first processor using the database, we have created the table corresponding to the File model manually in the start method. This operation must be done before we try to access the content of the table, otherwise the database will generate an error. If a table is already existing, then the create_table command is actually ignored.
One of the biggest advantage of inheriting from MAFwBaseModel is that the creation of all models can be automatized by using a processor included in MAFw library: the TableCreator. You can simply include this processor in your TOML steering file, possibly as a first processor in the list and afterwards you can forget about creating tables.
This processor is customizable via two parameters:
apply_only_to_prefix: allows to restrict the creation of tables whose name is starting with a given prefix. More than one prefix can be provided.
force_recreate: will force the tables to be recreated in the case they are already existing. This is rather dangerous because, the processor will actually drop all tables before creating them causing the loss of all your data. Use it with extreme care!!!
You still have the freedom to disable this automatic feature by setting the automatic_creation flag in the Meta class to False, like in this example:
from mafw.db.db_model import MAFwBaseModel

class NoAutoModel(MAFwBaseModel):
    # put here your fields
    class Meta:
        automatic_creation = False
Remember: only registered models can have tables automatically created. If you decided not to register a model, then you will have to manually create the corresponding table before using it.
Triggers: when the database works on its own
In the next paragraphs we will spend a few minutes understanding the roles of Triggers. Those are database entities performing some actions in response of specific events. You can have, for example, a trigger that is inserting a row in TableB whenever a row is inserted in TableA. If you are not really familiar with triggers, this is a brief introduction.
Triggers are very handy for many applications, and in our tutorial we will see an interesting case, but they tend to struggle with ORM in general. In fact, no ORM system is natively supporting triggers. The reason is very simple. In an ORM, the application (the python code, if you wish) is the main actor and the database is just playing the role of the passive buddy. From the point of view of an ORM based application, if you want to have a trigger, then just write the needed lines of python code to have the actions performed in the other tables. It makes totally sense, you have only one active player and it simplifies the debugging because if something is going wrong, it can only be a fault of the application.
The standard implementation of trigger-like functions with ORM is to use signals, where you can have callbacks called before and after high level ORM APIs calls to the underlying database. Signals are good, but they are not free from disadvantages: at a first glance, they look like a neat solution, but as soon as the number of callbacks is growing, it may become difficult to follow a linear path in the application debugging. Second, if you do a change in the database from another application, like the dbeaver browser, then none of your codified triggers will be executed. Moreover in the case of Peewee, signals work only on Model instances, so all bulk inserts and updates are excluded.
Having triggers in the database would assure that irrespectively of the source of the change, they will always be executed, but as mentioned above, the user will have to be more careful in the debug because also the database is now playing an active role.
We let you decide what is the best solution. If you want to follow the pure ORM approach, then all models inheriting from MAFwBaseModel have the possibility to use signals. If you want to have triggers, you can also do so. An example for both approaches is shown here below.
The signal approach
As mentioned above, the signal approach is the favourite one if you plan to make all changes to the database only via your python code. If you are considering making changes also from other applications, then you should better use the trigger approach.
Another limitation is that only model instances emit signals. Everytime you use a classmethod of a Model, then no signals will be emitted.
The signal dispatching pattern functionality is achieved by linking the signal emitted by a sender in some specific circumstances to a handler that is receiving this signal and performing some additional operations (not necessarily database operations).
Every model class has five different signals:
pre_save: emitted just before that a model instance is saved;
post_save: emitted just after the saving of a model instance in the DB;
pre_delete: emitted just before deleting a model instance in the DB;
post_delete: emitted just after deleting a model instance from the DB;
pre_init: emitted just after the init method of the class is invoked. Note that the pre is actually a post in the case of init.
Let us try to understand how this works with the next example.
 1class MyTable(MAFwBaseModel):
 2    id_ = AutoField(primary_key=True)
 3    integer = IntegerField()
 4    float_num = FloatField()
 5
 6class TargetTable(MAFwBaseModel):
 7    id_ = ForeignKeyField(MyTable, on_delete='cascade', primary_key=True, backref='half')
 8    another_float_num = FloatField()
 9
10    @post_save(sender=MyTable, name='my_table_after_save_handler')
11    def post_save_of_my_table(sender: type(MAFwBaseModel), instance: MAFwBaseModel, created: bool):
12        """
13        Handler for the post save signal.
14
15        The post_save decorator is taking care of making the connection.
16        The sender specified in the decorator argument is assuring that only signals generated from MyClass will be
17        dispatched to this handler.
18
19        The name in the decorator is optional and can be use if we want to disconnect the signal from the handler.
20
21        :param sender: The Model class sending this signal.
22        :type sender: type(Model)
23        :param instance: The actual instance sending the signal.
24        :type instance: Model
25        :param created: Bool flag if the instance has been created.
26        :type created: bool
27        """
28        TargetTable.insert({'id__id': instance.id, 'another_float_num': instance.float_num / 2}).execute()
29
30database: Database = SqliteDatabase(':memory:', pragmas=DEFAULT_SQLITE_PRAGMAS)
31database.connect()
32database_proxy.initialize(database)
33database.create_tables([MyTable, TargetTable], safe=True)
34
35MyTable.delete().execute()
36TargetTable.delete().execute()
37
38# insert a single row in MyTable with the save method.
39my_table = MyTable()
40my_table.integer = 20
41my_table.float_num = 32.16
42my_table.save()
43# after the save query is done, the signal mechanism will call the
44# post_save_trigger_of_my_table and perform an insert on the target
45# table as well.
46assert MyTable.select().count() == 1
47assert TargetTable.select().count() == 1
48
49# add some bulk data to MyTable
50data = []
51for i in range(100):
52    data.append(dict(integer=random.randint(i, 10 * i), float_num=random.gauss(i, 2 * i)))
53MyTable.insert_many(data).execute()
54# this is done via the Model class and not via a concrete instance of the Model, so no signals will be emitted.
55
56assert MyTable.select().count() == 101
57assert TargetTable.select().count() == 1
We created two tables linked via a foreign key. The goal is that everytime we fill in a row in MyTable, a row is
also added to TargetTable with the same id but where the value of another_float_num is just half of the original
float_num. The example is stupid, but it is good enough for our demonstration.
The signal part is coded in the lines from 11 to 28 (mainly doc strings). We use the post_save decorator to connect
MyTable to the post_save_of_my_table function where an insert in the TargetTable will be made.
The code is rather simple to follow. Just to be sure, we empty the two tables, then we create an instance of the MyTable model, to set the integer and the float_num column. When we save the new row, the post_save signal of MyTable is emitted and the handler is reacting by creating an entry in the TargetTable as well. In fact the number of rows of both tables are equal to 1.
What happens later is to demonstrate the weak point of signals. At line 53, we insert several rows via a
insert_many. It must be noted that the insert_many is a classmethod applied directly to the model class.
The consequence is that the signal handler will not be invoked and no extra rows will be added to the TargetTable.
The trigger approach
In order to use a trigger you need to create it. This is an entity that lives in the database, so you would need the database itself to create it.
MAFw is providing a Trigger class that helps you in creating the required SQL query that needed to be issued in order to create the trigger. Once it is created it will operate continuously.
If you have a look at the CREATE TRIGGER SQL command you will see that it starts with the definition of when the trigger is entering into play (BEFORE/AFTER) and which operation (INSERT/DELETE/UPDATE) of which table. Then there is a section enclosed by the BEGIN and END keywords, where you can have as many SQL queries as you like.
The same structure is reproduced in the Trigger class. In the constructor, we will pass the arguments related to the configuration of the trigger itself. Then you can add as many SQL statement as you wish.
1from mafw.db.db_model import Trigger
2
3new_trigger = Trigger('trigger_after_update', (TriggerWhen.After,
4        TriggerAction.Update), 'my_table', safe=False, for_each_row=False)
5new_trigger.add_sql('INSERT INTO another_table (col1, col2) VALUES (1, 2)')
6new_trigger.add_sql('INSERT INTO third_table (col1, col2) VALUES (2, 3)'))
7new_trigger.create()
1CREATE TRIGGER trigger_after_update
2AFTER UPDATE  ON my_table
3
4BEGIN
5    INSERT INTO another_table (col1, col2) VALUES (1, 2);
6    INSERT INTO third_table (col1, col2) VALUES (2, 3);
7END;
Now let us have a look at how you can use this, following one of our test benches.
Standalone triggers
 1def test_manually_created_trigger():
 2    class MyTable(MAFwBaseModel):
 3        id_ = AutoField(primary_key=True)
 4        integer = IntegerField()
 5        float_num = FloatField()
 6
 7    class TargetTable(MAFwBaseModel):
 8        id_ = ForeignKeyField(MyTable, on_delete='cascade', primary_key=True, backref='half')
 9        half_float_num = FloatField()
10
11    database: Database = SqliteDatabase(':memory:', pragmas=DEFAULT_SQLITE_PRAGMAS)
12    database.connect()
13    database_proxy.initialize(database)
14    database.create_tables([MyTable, TargetTable], safe=True)
15
16    MyTable.delete().execute()
17    TargetTable.delete().execute()
18
19    # manually create a trigger
20    trig = Trigger('mytable_after_insert', (TriggerWhen.After, TriggerAction.Insert), MyTable, safe=True)
21    trig.add_sql('INSERT INTO target_table (id__id, half_float_num) VALUES (NEW.id_, NEW.float_num / 2)')
22    database.execute_sql(trig.create())
23
24    # add some data for testing to the first table
25    data = []
26    for i in range(100):
27        data.append(dict(integer=random.randint(i, 10 * i), float_num=random.gauss(i, 2 * i)))
28    MyTable.insert_many(data).execute()
29
30    # check that the target table got the right entries
31    for row in MyTable.select(MyTable.float_num, TargetTable.half_float_num).join(TargetTable).namedtuples():
32        assert row.float_num == 2 * row.half_float_num
33
34    assert MyTable.select().count() == TargetTable.select().count()
In lines 20 - 22, we create a trigger and we ask the database to execute the generated SQL statement.
We insert 100 rows using the insert many class method and the trigger is doing its job in the background filling the other table. We can check that the values in the two tables are matching our expectations.
The drawback of this approach is that you may have triggers created all around your code, making your code a bit messy.
Model embedded triggers
An alternative approach is to define the trigger within the Model class, allowing it to be created simultaneously with model table. This is demonstrated in the code example below.
 1# the trigger is directly defined in the class.
 2class MyTable(MAFwBaseModel):
 3    id_ = AutoField(primary_key=True)
 4    integer = IntegerField()
 5    float_num = FloatField()
 6
 7    @classmethod
 8    def triggers(cls):
 9        return [
10            Trigger('mytable_after_insert', (TriggerWhen.After, TriggerAction.Insert), cls, safe=True).add_sql(
11                'INSERT INTO target_table (id__id, half_float_num) VALUES (NEW.id_, NEW.float_num / 2)'
12            )
13        ]
14
15class TargetTable(MAFwBaseModel):
16    id_ = ForeignKeyField(MyTable, on_delete='cascade', primary_key=True, backref='half')
17    half_float_num = FloatField()
18
19database: Database = SqliteDatabase(':memory:', pragmas=DEFAULT_SQLITE_PRAGMAS)
20database.connect()
21database_proxy.initialize(database)
22database.create_tables([MyTable, TargetTable], safe=True)
This approach is much cleaner. The Trigger is stored directly in the Model (lines 8 - 13). In the specific case, the triggers method returned one trigger only, but you can return as many as you like. When the tables are created (line 22), all the triggers will also be created.
In the example above, you have written the SQL statement directly, but nobody is preventing you to use peewee queries for this purpose. See below, how exactly the same trigger might be re-written, using an insert statement:
 1class MyTable(MAFwBaseModel):
 2    id_ = AutoField(primary_key=True)
 3    integer = IntegerField()
 4    float_num = FloatField()
 5
 6    @classmethod
 7    def triggers(cls):
 8        trigger = Trigger('mytable_after_insert', (TriggerWhen.After, TriggerAction.Insert), cls, safe=True)
 9        sql = TargetTable.insert(id_=SQL('NEW.id_'), half_float_num=SQL('NEW.float_num/2'))
10        trigger.add_sql(sql)
11        return [trigger]
12
13    class Meta:
14        depends_on = [TargetTable]
The key point here is at line 9, where the actual insert statement is generated by peewee (just for your information, you have generated the statement, but you have not execute it) and added to the existing trigger.
In the last two highlighted lines, we are overloading the Meta class, specifying that MyTable, depends on TargetTable, so that when the create_tables is issued, they are built in the right order. This is not necessary if you follow the previous approach because the trigger will be very likely executed only after that the tables have been created.
Warning
Even though starting from MAFw release v1.1.0, triggers are now properly generated for the three main database backends, its use has been deeply tested only with SQLite. For this reason, we (MAFw developers) encourage the user community to work also with other DBs and, in case, submit bugs or feature request.
Disabling triggers
Not all database implementations provide the same option to temporarily disable one or more triggers. In order to cope with this limitation, MAFw is providing a general solution that is always working independently of the concrete implementation of the database.
The standard SQL trigger definition allows to have one or more WHEN clauses [3], meaning that the firing of a trigger script might be limited to the case in which some other external conditions are met.
In order to achieve that, we use one of our standard tables, that are automatically created in every MAFw database.
This is the TriggerStatus table as you can see it in the snippet below:
class TriggerStatus(StandardTable):
    """A Model for the trigger status"""

    trigger_type_id = AutoField(primary_key=True, help_text='Primary key')
    trigger_type = TextField(
        help_text='You can use it to specify the type (DELETE/INSERT/UPDATE) or the name of a specific trigger'
    )
    status = BooleanField(default=True, help_text='False (0) = disable / True (1) = enable')

    # noinspection PyProtectedMember
    @classmethod
    def init(cls) -> None:
        """Resets all triggers to enable when the database connection is opened."""
        data = [
            dict(trigger_type_id=1, trigger_type='DELETE', status=True),
            dict(trigger_type_id=2, trigger_type='INSERT', status=True),
            dict(trigger_type_id=3, trigger_type='UPDATE', status=True),
            dict(trigger_type_id=4, trigger_type='DELETE_FILES', status=True),
        ]

        # this is used just to make mypy happy
        # cls and meta_cls are exactly the same thing
        meta_cls = cast(PeeweeModelWithMeta, cls)

        db_proxy = meta_cls._meta.database
        if isinstance(db_proxy, peewee.DatabaseProxy):
            db = cast(peewee.Database, db_proxy.obj)
        else:
            db = cast(peewee.Database, db_proxy)

        if isinstance(db, peewee.PostgresqlDatabase):
            cls.insert_many(data).on_conflict(
                'update', conflict_target=[cls.trigger_type_id], update={cls.status: True}
            ).execute()  # type: ignore[no-untyped-call]
        else:
            cls.insert_many(data).on_conflict_replace().execute()  # type: ignore[no-untyped-call]
You can use the trigger_type column to specify a generic family of triggers (DELETE/INSERT/UPDATE) or the name of a specific trigger. By default a trigger is active (status = 1), but you can easily disable it by changing its status to 0.
To use this functionality, the Trigger definition should include a WHEN clause as described in this modified model definition.
class MyTable(MAFwBaseModel):
    id_ = AutoField(primary_key=True)
    integer = IntegerField()
    float_num = FloatField()

    @classmethod
    def triggers(cls):
        return [
            Trigger('mytable_after_insert', (TriggerWhen.After, TriggerAction.Insert), cls, safe=True)
            .add_sql('INSERT INTO target_table (id__id, half_float_num) VALUES (NEW.id_, NEW.float_num / 2)')
            .add_when('1 == (SELECT status FROM trigger_status WHERE trigger_type == "INSERT")')
        ]
To facilitate the temporary disabling of a specific trigger family, MAFw provides a special class
TriggerDisabler that can be easily used as a context manager in your code. This is an ultra simplified
snippet.
with TriggerDisabler(trigger_type_id = 1):
    # do something without triggering the execution of any trigger of type 1
    # in case of exceptions thrown within the block, the context manager is restoring
    # the trigger status to 1.
Triggers on different databases
We have seen that Peewee provides an abstract interface that allows interaction with various SQL databases like MySQL, PostgreSQL, and SQLite.
This abstraction simplifies database operations by enabling the same codebase to work across different database backends, thanks to the common SQL language they all support. However, while these databases share SQL as their query language, they differ in how they handle certain features, such as triggers. Each database has its own peculiarities and syntax for defining and managing triggers, which can lead to inconsistencies when using a single approach across all databases.
To address this challenge, the MAFw introduced the TriggerDialect abstract class and three specific
implementations for the main databases. Relying on the use of the TriggerDialect class, a syntactically correct SQL
statement for the creation or removal of triggers is generated. But, MAFw cannot read the mind of the user (yet!) and
given the very different behaviour of the databases, the operation of the triggers will be different.
Have a look at the table below for an illustrative comparison on how triggers are handled by the different databases.
Feature |
MySQL |
PostgreSQL |
SQLite |
|---|---|---|---|
Trigger Event |
|
|
|
Trigger Time |
|
|
|
Activation |
Row-level only |
Row-level and statement-level |
Row-level and statement-level |
Implementation |
BEGIN-END block with SQL statements (supports non-standard SQL like SET statements) |
Functions written in PL/pgSQL, PL/Perl, PL/Python, etc. |
BEGIN-END block with SQL statements |
Trigger Per Event |
Multiple triggers allowed ordered by creation time |
Multiple triggers allowed ordered alphabetically by default, can be specified |
Multiple triggers allowed but unspecified execution order |
Privileges required |
TRIGGER privilege on the table and SUPER or SYSTEM_VARIABLES_ADMIN for DEFINER |
CREATE TRIGGER privilege on schema and TRIGGER privilege on table |
No specific privilege model |
Foreign Key Cascading |
Cascaded foreign key actions do not activate triggers |
Triggers are activated by cascaded foreign key actions |
Triggers are activated by cascaded foreign key actions |
Disabled/Enabled Trigger |
Yes, using ALTER TABLE … DISABLE/ENABLE TRIGGER |
Yes, using ALTER TABLE … DISABLE/ENABLE TRIGGER |
No direct mechanism to disable |
PostgreSQL offers the most comprehensive trigger functionality, with built-in support for both row-level and statement-level triggers, INSTEAD OF triggers for views, and the widest range of programming languages for implementation. Its trigger functions can be written in any supported procedural language, providing considerable flexibility.
MySQL implements triggers using SQL statements within BEGIN-END blocks and only supports row-level triggers. It allows non-standard SQL statements like SET within trigger bodies, making it somewhat more flexible for certain operations. A critical limitation is that MySQL triggers are not activated by cascaded foreign key actions, unlike the other databases. This is a strong limiting factor and the user should consider it when designing the database model to store their data. In this case, it might be convenient to not rely at all on the cascading operations, but to have dedicated triggers for this purpose.
SQLite provides more trigger capabilities than it might initially appear. While its implementation is simpler than PostgreSQL’s, it supports both row-level and statement-level triggers (statement-level being the default if FOR EACH ROW is not specified). Like PostgreSQL, SQLite triggers are activated by cascaded foreign key actions, which creates an important behavioral difference compared to MySQL.
When designing database applications that may need to work across different database systems, these implementation differences can lead to subtle bugs, especially around foreign key cascading behavior. MySQL applications that rely on triggers not firing during cascaded operations might behave differently when migrated to PostgreSQL or SQLite. Similarly, applications that depend on statement-level triggers will need to be redesigned when moving from PostgreSQL or SQLite to MySQL.
All so said, even though MAFw provides a way to handle triggers creation and removal in the same way across all the databases, the user who wants to move from one DB implementation to the other should carefully review the content of the trigger body to ensure that the resulting behavior is what is expected.
Debugging triggers
The challenges connected to debugging triggers have been already mentioned several times. It is a block of code that is executed outside the application in full autonomy and you cannot put a breakpoint in the database. If you see that your code is not behaving as expected and you doubt that triggers can be behind the malfunctioning, then the general recommendation is to proceed one step at the time, trying to simplify as much as possible the trigger function.
In all these cases, you will need to drop the triggers from the database and recreate them with the simplified / corrected implementation. This is a bit annoying because it cannot be done directly from the application because very likely you have embedded your triggers in the target class, so you have no way to retrieve them.
The solution is to use the TriggerRefresher processor. It will take care of dropping all triggers in the database and recreate them from the corresponding model definition. The idea of dropping something is generally rather scary, because it is a undoable operation; but if you put all your trigger definitions inside the various models and they are all subclasses of MAFwBaseModel, then they will all recreated using their latest definition.
You can even leave the TriggerRefresher processor in your analysis pipelines all the times!
Standard tables
In the previous section, we discussed a workaround implemented by MAFw to address the limitations of database backends that cannot temporarily disable trigger execution. This is achieved querying a table where the status of a specific trigger or a family of triggers can be toggled from active to inactive and vice-versa.
This TriggerStatus model is one of the so-called MAFw standard tables,
The main differences between a Model inheriting from MAFwBaseModel and one inheriting from StandardTable are two:
A standard table has an additional
initialisation method, that can be used to set or restore the default content of the table.Automatic creation and initialisation performed by MAFw when the database connection is established. In other words, as soon as your processor connect to a database, it will retrieve from the
ModelRegisterall the standard tables, create them and initialise them.
Note
To avoid useless multiple creation and initialisation of standard tables, only the first Processor or ProcessorList that is establishing a connection to the database, is taking the responsibility to proceed with the standard table creation and initialisation task.
This means that if you manually connect to a database and you pass the database object to your Processor/ProcessorList, then the standard table creation and initialisation will be skipped, because your Processor/ProcessorList will think that it was already done when the database connection was established.
The automatic creation and initialisation can be disabled, either using the Processor.create_standard_tables argument in the Processor or ProcessorList constructor, or, if you run the pipelines via the mafw executables using the top level create_standard_table variable in your steering file.
The role of those tables is to support the functionality of the whole analysis pipeline, they are rarely the direct input / output of a specific processor. If you want to add your own, just create a model inheriting from StandardTable or make your own subclass, to customize for example the prefix, and the automatic registration in the model register will do the trick.
Default standard tables
Along with the TriggerStatus, there are two other relevant standard tables: the OrphanFile and the PlotterOutput.
OrphanFile: the house of files without a rowThis table can be profitably used in conjunction with Triggers. The user can define a trigger fired when a row in a table is deleted. The trigger will then insert all file references contained in the deleted row into the OrphanFile model.
The next time a processor (it does not matter which one) having access to the database is executed, it will query the full list of files from the
OrphanFileand remove them.This procedure is needed to avoid having files on your disc without a reference in the database. It is kind of a complementary cleaning up with respect to
another functionyou will discover in a moment.Additional details about this function are provided directly in the
API.
PlotterOutput: where all figures go.
Plottersare specialProcessorsubclasses with the goal of generating a graphical representation of some data you have produced in a previous step.The output of a plotter is in many cases one or more figure files and instead of having to define a specific table to store just one line, MAFw is providing a common table for all plotters where they can store the reference to their output files linked to the plotter name.
It is very useful because it allows the user to skip the execution of a plotter if its output file already exists on disc.
Triggers are again very relevant, because when a change is made in the data used to generate a plotter output, then the corresponding rows in this table should also be removed, in order to force the regeneration of the output figures with the updated data.
Custom fields
We have seen in a previous section that there are plenty of field types for you to build up your model classes and that it is also possible to add additional ones. We have made a few for you that are very useful from the point of view of MAFw. The full list is available here.
The role of the database in MAFw is to support the input / output operation. You do not need to worry about specifying filenames or paths. Simply instruct the database to retrieve a list of items, and it will automatically provide the various processors with the necessary file paths for analysis.
With this in mind, we have created a FileNameField, that is the evolution of a text field accepting a Path object as a python type and converting it into a string for database storage. On top of FileNameField, we have made FileNameListField that can contain a list of filenames. This second one is more appropriate when your processor is generating a group of files as output. The filenames are stored in the database as a ‘;’ separated string, and they are seen by the python application as a list of Path objects.
Similarly, we have also a FileChecksumField to store the string of hexadecimal characters corresponding to the checksum of a file (or a list of files). From the python side, you can assign either the checksum directly, as generated for example by file_checksum() or the path to the file, and the field will calculate the checksum automatically.
The FileNameField and FileNameListField accept an additional argument in their constructor, called checksum_field. If you set it to the name of a FileChecksumField in the same table, then you do not even have to set the value of the checksum field because this will be automatically calculated when the row is saved.
With these custom fields in mind, our initial definition of a File table, can be re-factored as follows:
1from peewee import AutoField
2
3from mafw.db.db_model import MAFwBaseModel
4from mafw.db.fields import FileNameField, FileChecksumField
5
6class File(MAFwBaseModel):
7    file_id = AutoField(primary_key=True, help_text='The primary key')
8    file_name = FileNameField(checksum_field='file_digest', help_text='The full filename')
9    file_digest = FileChecksumField(help_text='The hex digest of the file')
Pay attention at the definition of the file_name field. The FileNameField constructor takes an optional parameter checksum_field that is actually pointing to the variable of the FileChecksumField.
You can use the two custom fields as normal, for example you can do:
1new_file = File()
2# you can assign a Path object.
3new_file.file_name = Path('/path/to/some/file')
4# the real checksum will be calculated automatically.
5# this next line is totally optional, you can leave it out and it will work in the same way.
6new_file.file_digest = Path('/path/to/some/file')
The super power of these two custom fields is that you can remove useless rows from the database, just issuing one command.
Removing widow rows
Due to its I/O support, the database content should always remain aligned with the files on your disc. If you have a row in your database pointing to a missing file, this may cause troubles, because sooner or later, you will try to access this missing file causing an application crash.
In MAFw nomenclature, those rows are called widows, following a similar concept in typesetting, because they are a fully valid database entry, but their data counter part on disc disappeared.
To avoid any problem with widow rows, MAFw is supplying a function that the processor can invoke in the start method on the Model classes used as input:
class MyProcessor(Processor):

    def start():
        super().start()
        remove_widow_db_rows(InputData)
The remove_widow_db_rows() will check that all the FileNameField fields in the table are pointing to existing files on disc. If not, then the row is removed from the database.
The function is not automatically called by any of the Processor super methods. It is up to the user to decide if and when to use it. Its recommended use is in the overload of the start() method or as a first action in the get_items() in the case of a for loop workflow, so that you are sure to re-generate the rows that have been removed.
Pruning orphan files
The opposite situation is when you have a file on disc that is not linked to an entry in the database anymore. This situation could be even more perilous than the previous one and may occur more frequently than you realize. The consequences of this mismatch can be severe, imagine that during the testing / development phase of your Processor you generate an output figure saved on disc. You then realize that the plot is wrong and you fix the bug and update the DB, but for some reasons you have forgotten to delete the figure file from the disc. Afterwards, while looking for the processor output, you find this file and believe it is a valid result and you use it for your publication. In order to prevent this to happen, you just have to follow some simple rules, and then the reliable machinery of MAFw will do the rest.
The key point is to use a specific trigger in every table that has a file name field. This trigger has to react before any delete query on such a table and inserting all FileNameFields or FileNameListFields in the OrphanFile table. You will see an example of such a trigger in the next paragraphs. This standard tables will be queried by the next processor being executed and during the start super method, all files in the Orphan table will be removed from the disc.
Let us try to understand this better with a step-by-step example. For simplicity, we have removed the import statements from the code snippet, but it should not be too difficult to understand the code anyway.
We begin with the declaration of our input model:
class File(MAFwBaseModel):
    file_id = AutoField(primary_key=True, help_text='primary key')
    file_name = FileNameField(checksum_field='check_sum', help_text='the file name')
    check_sum = FileChecksumField(help_text='checksum')

    @classmethod
    def triggers(cls) -> list[Trigger]:
        file_delete_file = Trigger(
            'file_delete_file',
            (TriggerWhen.Before, TriggerAction.Delete),
            source_table=cls,
            safe=True,
            for_each_row=True,
        )
        file_delete_file.add_when('1 == (SELECT status FROM trigger_status WHERE trigger_type = "DELETE_FILES")')
        file_delete_file.add_sql(OrphanFile.insert(filenames=SQL('OLD.file_name'), checksum=SQL('OLD.file_name')))
        return [file_delete_file]

    class Meta:
        depends_on = [OrphanFile]
Here you see the trigger definition: it is a before delete type and when triggered it is adding the filename field to the OrphanFile table. It is important to notice that this trigger has a when condition and will only be executed when the trigger type DELETE_FILES is enabled. This is necessary for the pruning mechanism to work, just copy this line in your trigger definition.
And now let us define some fake processors. First we import some files into our model, then we remove some rows from the file table and finally other two processors, doing nothing but useful to demonstrate the effect of the orphan removal.
@database_required
class FileImporter(Processor):
    input_folder = ActiveParameter('input_folder', default=Path.cwd(), help_doc='From where to import')

    def __init__(self, *args, **kwargs):
        super().__init__(*args, looper=LoopType.SingleLoop, **kwargs)
        self.n_files: int = -1

    def start(self):
        super().start()
        self.database.create_tables([File])
        File.delete().execute()

    def process(self):
        data = [(f, f) for f in self.input_folder.glob('**/*dat')]
        File.insert_many(data, fields=['file_name', 'check_sum']).execute()
        self.n_files = len(data)

    def finish(self):
        super().finish()
        if File.select().count() != self.n_files:
            self.processor_exit_status = ProcessorExitStatus.Failed

@database_required
class RowRemover(Processor):
    n_rows = ActiveParameter('n_rows', default=0, help_doc='How many rows to be removed')

    def __init__(self, *args, **kwargs):
        super().__init__(*args, looper=LoopType.SingleLoop, **kwargs)
        self.n_initial = 0

    def start(self):
        super().start()
        self.database.create_tables([File])

    def process(self):
        self.n_initial = File.select().count()
        query = File.select().order_by(fn.Random()).limit(self.n_rows).execute()
        ids = [q.file_id for q in query]
        File.delete().where(File.file_id.in_(ids)).execute()

    def finish(self):
        super().finish()
        if File.select().count() != self.n_initial - self.n_rows or OrphanFile.select().count() != self.n_rows:
            self.processor_exit_status = ProcessorExitStatus.Failed

@orphan_protector
@database_required
class OrphanProtector(Processor):
    def __init__(self, *args, **kwargs):
        super().__init__(looper=LoopType.SingleLoop, *args, **kwargs)
        self.n_orphan = 0

    def start(self):
        self.n_orphan = OrphanFile.select().count()
        super().start()

    def finish(self):
        super().finish()
        if OrphanFile.select().count() != self.n_orphan:
            self.processor_exit_status = ProcessorExitStatus.Failed

@single_loop
class LazyProcessor(Processor):
    def finish(self):
        super().finish()
        if OrphanFile.select().count() != 0:
            self.processor_exit_status = ProcessorExitStatus.Failed
The FileImporter [4] is very simple, it reads all dat files in a directory and loads them in the File model along with their checksum. Just to be sure we empty the File model in the start and in the finish we check that the number of rows in File is the same as the number of files in the folder.
The RowRemover is getting an integer number of rows to be removed. Even though the File model is already created, it is a good practice to repeat the statement again in the start method. Then we select some random rows from File and we delete them. At this point, we have created some orphan files on disc without related rows in the DB. Finally (in the finish method), we verify that the number of remaining rows in the database aligns with our expectations. Additionally, we ensure that the trigger functioned correctly, resulting in the appropriate rows being added to the OrphanFile model.
The OrphanProtector does even less than the others. But if you look carefully, you will see that along with the database_required() there is also the orphan_protector() decorator. This will prevent the processor to perform the check on the OrphanFile model and deleting the unrelated files.
In the start method, we record the number of orphan files in the OrphanFile model and we confirm that they are still there in the finish. Since the actual removal of the orphan files happens in the processor start method, we need to count the number of orphans before calling the super start.
The LazyProcessor is responsible to check that there are no rows left in the OrphanFile, meaning that the removal was successful.
And now let us put everything together and run it.
db_conf = default_conf['sqlite']
db_conf['URL'] = 'sqlite:///:memory:'
plist = ProcessorList(name='Orphan test', description='dealing with orphan files', database_conf=db_conf)
importer = FileImporter(input_folder=tmp_path)
remover = RowRemover(n_rows=n_delete)
protector = OrphanProtector()
lazy = LazyProcessor()
plist.extend([importer, remover, protector, lazy])
plist.execute()

assert importer.processor_exit_status == ProcessorExitStatus.Successful
assert remover.processor_exit_status == ProcessorExitStatus.Successful
assert protector.processor_exit_status == ProcessorExitStatus.Successful
assert lazy.processor_exit_status == ProcessorExitStatus.Successful
In practice, the only thing you have to take care of is to add a dedicated trigger to each of your tables having at least a file field and then the rest will be automatically performed by MAFw.
Warning
You should be very careful if your processor is removing rows from the target table (where you should be storing the processor’s results). This might be the case of a processor that wants to reset the status of your analysis to a previous step, for example. In this case, as soon as ProcessorA removes the rows from the model, the trigger will inserts all FileNameFields in the OrphanFile model in order to be deleted. This is a lazy operation and will be performed by the following processor to be executed either in the same pipeline or in the next. When ProcessorA will have finished its work, the target table will be repopulated and the same will happen to the folders on the disc. Now the next processor will empty the orphan file model and possibly remove the freshly generated files.
You have two solutions for this problem: either you block the execution of the trigger when deleting the rows (you can use the TriggerDisabler for this purpose), in this way the rows in the model will be removed, but not the files from disc with the risks we have already mentioned. The second possibility is to force the processor to immediately take care of the orphan file pruning. This is the suggested procedure and you only need to include a call to the _remove_orphan_files() soon after the delete query.
Automatic creation of file removal trigger
In the definition of File model we have manually created a trigger that is fired every time a row is removed from the table. The action of this trigger is to insert in the OrphanFile model the content of the FileNameField that is actually the specifically designed Field type to store a path to a file.
This trigger creation part can be totally automatized, if you want to insert in the OrphanFile the content of all FileNameField and FileNameListField fields. The automatic creation is another advantage of using the MAFwBaseModel. This functionality can be activated very simply by setting a flag in the metadata class.
class File(MAFwBaseModel):
    file_id = AutoField(primary_key=True, help_text='primary key')
    file_name = FileNameField(checksum_field='check_sum', help_text='the file name')
    check_sum = FileChecksumField(help_text='checksum')

    class Meta:
        depends_on = [OrphanFile]
        file_trigger_auto_create = True
This model class is absolutely identical to the previous one; MAFw base model will take care of generating the necessary trigger.
It is worth remembering that file_trigger_auto_create is inherited by subclasses, so if you want all the models in your project to have this feature, you can simply set it to true in your base model.
Warning
We have already mentioned the main disadvantage of working with triggers, that is to say the difficult debugging. Triggers are pieces of code that are executed in full autonomy by the database, so when you are trying to understand why your analysis pipeline is not working as expected a part from looking at your python code, you should also keep in mind that triggers might be the source of the problem.
This effect is amplified, if you turn on the automatic trigger creation, because you don’t even see the trigger definition in your python code and you may have forgotten about the auto trigger flag. As always with great power comes even greater responsibility!
Keeping the entries updated
One aspect is that the file exists; another is that the file content remains unchanged. You may have replaced an input file with a newer one and the database will not know it. If your processors are only executed on items for which there is still no output generated, then this replaced file may go unnoticed causing issues to your analysis.
For this reason, we are strongly recommending to always add a checksum field for each file field in your table. Calculating a checksum is just a matter of a split second on modern CPU while the time for the debugging your analysis code is for sure longer.
The function verify_checksum() takes a Model as argument and will verify that all checksums are still valid. In other words, for each FileNameField (or FileNameListField) with a link to a checksum field in the table, the function will compare the actual digest with the stored one. If it is different, then the DB row will be removed.
Also this function is not automatically called by any processor super methods. It is ultimately the user’s responsibility to decide whether to proceed, bearing in mind that working with long tables and large files may result in delays in processor execution.
The implementation is very similar to the previous one, just change the function name. Keep in mind that the verify_checksum() will implicitly check for the existence of files and warn you if some items are missing, so you can avoid the remove_widow_db_rows(), if you perform the checksum verification.
class MyProcessor(Processor):

    def start():
        super().start()
        verify_checksum(InputData)
Multi-primary key columns
Special attention is required when you need to have a primary key that is spanning over two or more columns of your model. So far we have seen how we can identify one column in the model as the primary key and now we will see what to do if you want to use more than one column as primary key and, even more important, how you can use this composite primary key as a foreign key in another model.
To describe this topic, we will make use of an example that you can also find in the examples modules of MAFw named multi_primary.
Let us start with the model definition.
 1class Sample(MAFwBaseModel, do_not_register=True):
 2    sample_id = AutoField(primary_key=True, help_text='The sample id primary key')
 3    sample_name = TextField(help_text='The sample name')
 4
 5class Resolution(MAFwBaseModel, do_not_register=True):
 6    resolution_id = AutoField(primary_key=True, help_text='The resolution id primary key')
 7    resolution_value = FloatField(help_text='The resolution in µm')
 8
 9class Image(MAFwBaseModel, do_not_register=True):
10    image_id = AutoField(primary_key=True, help_text='The image id primary key')
11    filename = FileNameField(help_text='The filename of the image', checksum_field='checksum')
12    checksum = FileChecksumField()
13    sample = ForeignKeyField(Sample, on_delete='CASCADE', backref='+', lazy_load=False, column_name='sample_id')
14    resolution = ForeignKeyField(
15        Resolution, on_delete='CASCADE', backref='+', lazy_load=False, column_name='resolution_id'
16    )
17
18class ProcessedImage(MAFwBaseModel, do_not_register=True):
19    image = ForeignKeyField(
20        Image,
21        primary_key=True,
22        backref='+',
23        help_text='The image id, foreign key and primary',
24        on_delete='CASCADE',
25        lazy_load=False,
26        column_name='image_id',
27    )
28    value = FloatField(default=0)
29
30class CalibrationMethod(MAFwBaseModel, do_not_register=True):
31    method_id = AutoField(primary_key=True, help_text='The primary key for the calculation method')
32    multiplier = FloatField(default=1.0, help_text='The multiplication factor of this method')
33
34class CalibratedImage(MAFwBaseModel, do_not_register=True):
35    image = ForeignKeyField(
36        ProcessedImage,
37        on_delete='CASCADE',
38        help_text='The reference to the processed image',
39        backref='+',
40        lazy_load=False,
41        column_name='image_id',
42    )
43    method = ForeignKeyField(
44        CalibrationMethod,
45        on_delete='CASCADE',
46        help_text='The reference to the calibration method',
47        backref='+',
48        lazy_load=False,
49        column_name='method_id',
50    )
51    calibrated_value = FloatField(default=0.0, help_text='The calibrated value')
52
53    @property
54    def primary_key(self) -> Iterable:
55        return self.image_id, self.method_id
56
57    class Meta:
58        primary_key = CompositeKey('image', 'method')
59
60class ColoredImage(MAFwBaseModel, do_not_register=True):
61    image_id = IntegerField(help_text='The reference to the processed image. Combined FK with method_id')
62    method_id = IntegerField(help_text='The reference to the calibration method. Combined FK with method_id')
63    red = FloatField(default=0, help_text='Fake red. Only for testing')
64    green = FloatField(default=0, help_text='Fake green. Only for testing')
65    blue = FloatField(default=0, help_text='Fake blue. Only for testing')
66
67    @property
68    def primary_key(self) -> Iterable:
69        return self.image_id, self.method_id
70
71    class Meta:
72        constraints = [
73            SQL(
74                'FOREIGN KEY (image_id, method_id) REFERENCES '
75                'calibrated_image(image_id, method_id) ON DELETE CASCADE'
76            )
77        ]
78        primary_key = CompositeKey('image_id', 'method_id')
79
As always, one single picture can convey more than a thousand lines of code. Here below the ERDs of Image and of CalibratedImage.

Fig. 2 The ERD of the Image Model
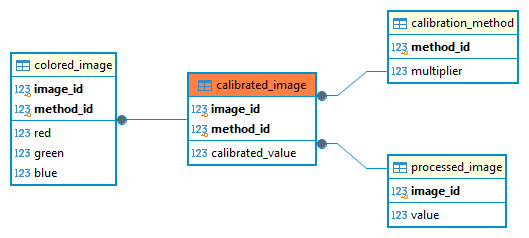
Fig. 3 The ERD of the CalibratedImage Model
In the diagrams, the fields with bold font represent primary keys, also highlighted by the separation line, while the arrow are the standard relation.
As in the examples above, we have images of different samples acquired with different resolutions entering the Image model. We use those lines to make some calculations and we obtain the rows in the ProcessedImage model. These two tables are in 1 to 1 relation and this relation is enforced with a delete cascade, meaning that if we delete an element in the Image model, the corresponding one in the ProcessedImage will also be deleted.
The CalibrationMethod model contains different sets of calibration constants to bring each row from the ProcessedImage model to the CalibratedImage one. It is natural to assume that the image_id and the method_id are the best candidates to be a combined primary key.
To achieve this, in the CalibratedImage model, we need to add (line 57-58) an overload of the Meta class, where we specify our CompositeKey. Pay attention to an important detail: the CompositeKey constructor takes the name of the fields and not the name of the columns, that in the case of foreign keys differ of ‘_id’. Optionally we can also define a primary_key property (line 53-55) to quickly retrieve the values of our keys.
From the application point of view, we want all the processed images to be calibrated with all possible calibration methods, that means we need to make a cross join as described below:
 1with database.atomic() as txn:
 2    cross_join = (
 3        ProcessedImage.select(ProcessedImage, CalibrationMethod).join(CalibrationMethod, JOIN.CROSS).execute()
 4    )
 5    for row in cross_join:
 6        calibrated_image = CalibratedImage()
 7        calibrated_image.image_id = row.image_id
 8        calibrated_image.method_id = row.method_id
 9        calibrated_image.calibrated_value = row.value * row.multiplier
10        calibrated_image.save(force_insert=True)
Up to this point we have seen what we have to do to specify a composite primary key, we cannot use the AutoField or the primary_key parameter, but we need to go through the Meta class in the way shown in the example.
The next step is to have another table (ColoredImage in our imaginary case) that is in relation with CalibratedImage. We would need to have again a composite primary key that is also a composite foreign key. Peewee does not support composite foreign keys, but we can use the workaround shown at lines 72-77. Along with the CompositeKey definition, we need to add a Constraint as well using the SQL function to convert a string into a valid SQL statement. This time, since we are using low level SQL directives, we have to use the column names (additional ‘_id’) instead of the field name.
And in a similar way we can insert items in the ColoredImage model.
1with database.atomic() as txn:
2    full_list = CalibratedImage.select().execute()
3
4    for row in full_list:
5        colored_image = ColoredImage(image_id=row.image_id, method_id=row.method_id)
6        colored_image.red = row.calibrated_value / 3
7        colored_image.green = row.calibrated_value / 3
8        colored_image.blue = row.calibrated_value / 3
9        colored_image.save(force_insert=True)
Now, with all the tables linked to each other, try to delete one from a table, and guess what will happen to all other tables.
This tutorial might be a bit more complex than the examples we have seen so far, but we believed you have appreciated the power of such a relational tool.
Importing an existing DB
The last section of this long chapter on database will show you how to deal with an existing DB. It is possible that before you have adopted MAFw for your analysis tasks, you were already employing a relational database to store your dataset and results. So far we have seen how to create tables in a database starting from an object oriented description (a model) in a python library. But what do we have to do if the database already exists? Can we create the classes starting from a database? This process goes under the name of reflection and it is the subject of this section.
The reflection of tables in python classes cannot be performed automatically at 100% by definition. A typical case is the use of application specific fields. Consider, for example, the FileNameField that we have discussed earlier. This field corresponds to a Path object when you look at it from the application point of view, but the actual path is saved as a text field in the concrete database implementation. If you now read the metadata of this table from the database point of view, you will see that the field will contain a text variable and thus the reflected class will not have any FileNameField.
Let us try to understand the process looking at the picture below. If we create the model in python, then we can assign special field descriptors to the table columns, but their concrete implementation in the database must be done using types that are available in the database itself. So when we perform the reverse process, we get only a good approximation of the initial definition.

Fig. 4 This is the model implementation as you would code it making use of the specific field definitions.

Fig. 5 During the actual implementation of the model as a database table, python column definitions will be translated into database types.
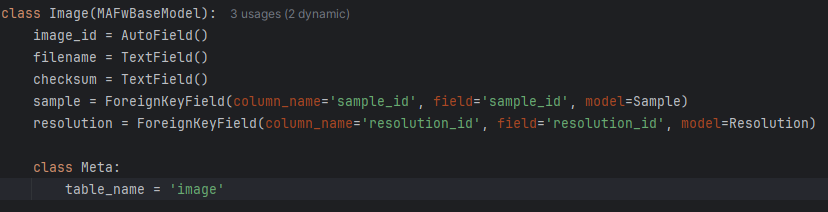
Fig. 6 The reflection process will translate the database implementation in a generic model implementation, not necessarily including all the specific field definition.
Nevertheless the process is rather efficient and can generate an excellent starting point that we can use to customize the model classes to make them more useful in our application.
From a practical point of view, you just have to open a console and type the command mafw db wizard --help to get some help on the tool and also read its documentation. You need to provide the name of the database and how to connect to it, in the case of Sqlite DB, it is enough to provide the filename, and you have to specify the name of the output python file that will contain all the model classes. This module is ready to go, you could theoretically import it into your project and use it, but it is strongly recommended to accurately check that everything is really the way you want it to be.
The reflection process is absolutely safe for your existing database, so it is worth to give it a try!
Execute SQL scripts
If you are not new to databases, you might have some SQL script files hanging around. Something link initialisation or optimisation procedure. If this is the case, you can include those in your analysis pipelines.
The SQLScriptRunner processor provides a convenient way to execute SQL scripts against your database. This is particularly useful when you need to perform database operations that are not easily expressed through the ORM or when you want to leverage database-specific features.
To use the SQLScriptRunner, you need to configure it in your steering file by specifying a list of SQL files to be processed. Here’s an example configuration:
[SQLScriptRunner]
sql_files = ["./scripts/init_schema.sql", "./scripts/populate_data.sql"]
The processor will:
Validate that all specified SQL files exist and are regular files
Read each SQL file content
Remove multi-line block comments (/* … */) from the SQL content
Split the content into individual SQL statements
Execute all statements within a single atomic transaction
This ensures that either all statements are executed successfully, or none are applied if an error occurs, maintaining database integrity.
Each SQL file should contain one or more valid SQL statements separated by semicolons. The processor automatically handles the transaction boundaries, so you don’t need to include explicit BEGIN/COMMIT statements in your SQL files.
Warning
Since all statements are executed within a single transaction, very large SQL files or operations that take a long time to complete might impact database performance. Consider breaking large scripts into smaller chunks if needed.
What’s next
Congratulations! You reached the end of the most difficult chapter in this tutorial. It is difficult because as a scientist you might not be used to deal with databases everyday, but their power is incredible, isn’t it?
The next chapter is about efficiency! You will learn how to process only the data you want and that need to be analysed. Get ready to understand database filters!
Footnotes