Processor: The core of MAFw
The Processor is responsible to carry out a specific analytical task, in other simple words, it takes some input data, it does some calculations or manipulations, and it produces some output data.
The input and output data can be of any type: a simple list of numbers, a structured data frame, a path to a file where data are stored, an output graph or a link to a web resource, a database table, and so on.
In ultra simplified words, a Processor does three sequential actions:
Prepare the conditions to operate (
start())Process the data (
process())Clean up what is left (
finish()).
Execution workflow
There are instances where tasks can be executed in a single operation across your entire dataset, such as generating a graph from the data. However, there are also situations where you need to iterate over a list of similar items, applying the same process repeatedly. Additionally, you may need to continue a process until a specific condition is met. The Processor can actually accomplish all those different execution workflows just by changing a variable: the loop type.
You will be presented a more detailed description of the different workflows in the following sections.
The single loop execution
The first family has a simplified execution workflow schematically shown here below:

The distinction of roles between the three methods is purely academic, one could implement all the preparation, the real calculation and the clean up in one method and the processor will work in the same way. The methods are anyhow preserved to offer a similar execution scheme also for the other looping scheme.
The for loop execution
In python a for loop is generally performed on a list of items and MAFw is actually following the same strategy. Here below is the schematic workflow.
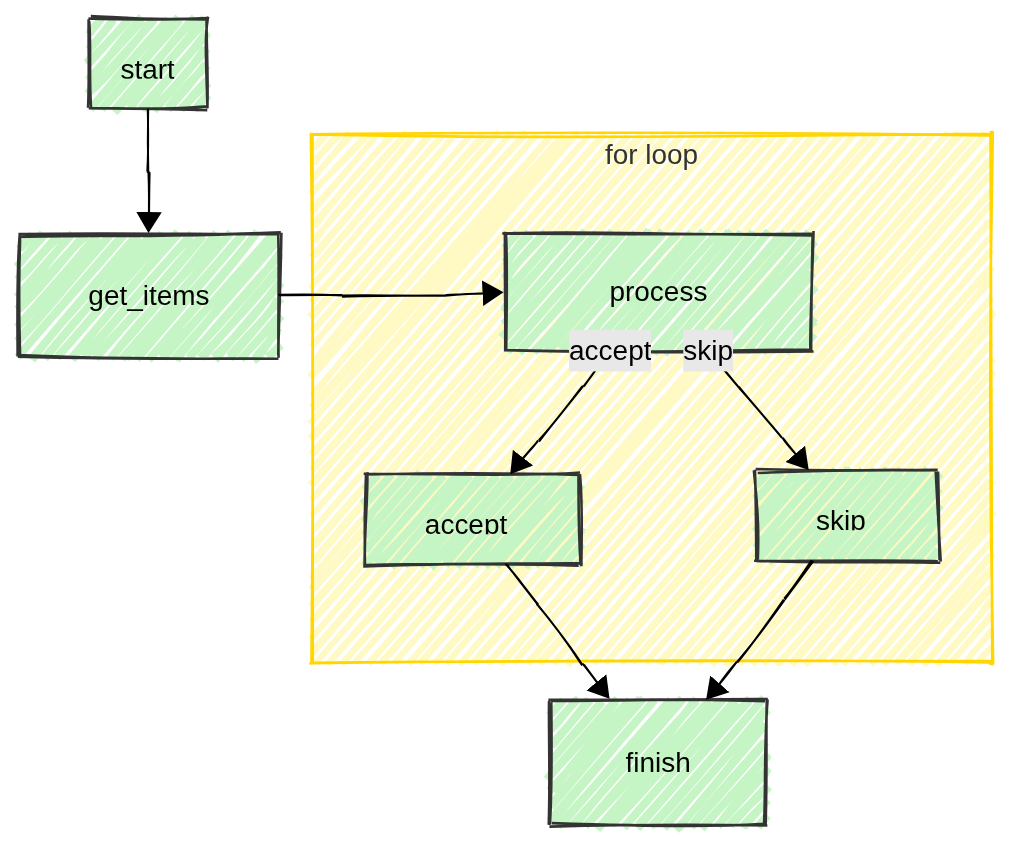
As you can see, after having called the start(), the user must provide a list of items to be processed implementing the get_items(). This can be the list of files in a directory, or the rows in a DB table or even a list of simple numbers; whatever best suit the user’s needs. You will soon learn how to deal with database entries and how to filter them.
Now everything is ready to start the loop and call the process() as many times as the items in the input list. In the process implementation, the user can realize that something went wrong with a particular item and can modify what is executed next (accept_item() or skip_item()). See an example of such a possibility here.
At the end of the loop it is time to clean up everything, saving files, updating DBs and so one. This is again the task of the finish() method.
The parallel for loop execution
The parallel for loop follows the same workflow as the standard for loop, but distributes items to a thread pool. This workflow is available only when Python is running in free-threading mode. If free-threading is not available, MAFw automatically falls back to the serial for loop and emits a warning.
Parallel execution does not guarantee item processing order. The accept_item() and skip_item() callbacks are executed in the worker threads, so any shared state (for instance lists, counters, or database writes) must be protected accordingly.
For the scientists developing their own processors, it is absolutely transparent if the for loop is executed serially or in a multi-thread pool. Just implement your analysis procedure in the three standard methods (Processor.start(), Processor.process() and Processor.finish()) and MAFw will take care of the rest.
If your processor is generating some results that you want to store locally in an attribute before putting them in a file or in a database table, follow the advice of the free-threading python guide and use a threading.Lock to prevent concurrent modifications even if built in types are supposed to use internal locks.
If you want to access the database from within the loop, the connection is also thread-safe according to peewee documentation.
The number of threads in the executor pool is a parameter that you can modify via the class attribute Processor.max_workers, by default it is set to the number of cores in your PC plus 4 capped to a maximum of 32. If you want to change this value, just pass max_workers to your processor constructor.
Note
You might wonder how the use of class attributes like Processor.item, Processor.i_item and Processor.n_item is possible in the Processor.process() implementation when multiple threads are working in parallel. The answer is that MAFw is transforming them in thread-locals before submitting the worker to the executor. If you are curious to know this is technically achieved look at the documentation and the source code of Processor._thread_loop_context().
The parallel for loop with queue and batches
From a pure parallel execution point of view, the locking mechanism inside the process might be a bottle neck in the performance gain and for this reason, MAFw is also offering a producer/consumer pattern implementation of multi-threaded looping.
The idea is to have a queue shared among a consumer thread and several producer threads. The consumer threads is taking care of emptying the queue as soon as there are items appearing, while the many producers are just enqueuing processed output as soon as they are ready.
A part from the maximum number of workers, for this type of parallel architecture you can also tune other two parameters: the Processor.queue_size (by default twice as large as the number of producer threads) and the Processor.queue_batch_size (default 1). A bigger queue can cause a large memory spike depending on the size of the payload that the producers are transferring to the consumer, while a smaller queue can cause congestion. In fact when the queue is full (because either the producers are too fast or the consumer is too slow), the whole process is kept on hold and the operating system will pause the producer threads to let the consumer make some space in the queue.
If the producers are too fast, meaning that the queue is immediately full, you can group the input items in batches, so that the producers have to perform their calculation on multiple items before transferring a list of results to the queue. A good tuning of the batch size can be a game changer in terms of performance!
How do you have to implement your processor? The queue-based parallel for loop keeps the processing workload in multiple worker threads but funnels the post-processing steps through a single consumer thread. In this workflow, accept_item() and skip_item() are executed by the consumer thread, providing serialized updates to shared state without explicit locking. Users can customize the consumer behavior by overloading consumer_start(), consumer_process(), or consumer_finish(). In general your process implementation should return (normally it does not return any value) the payload that the consumer will have to retrieve from the queue for post-processing. You just return the value that you want to have in the consumer_process() and MAFw will do all the multi-thread plumbing behind the scene to let you receive the value exactly where you need it.
Do you want to see an example? We have you covered, have a look at this specific example!
Loop tuning with steering files
I can see the question arising in your mind? How do I know which parallel processing approach should I follow and which are the best performing parameters? Even though there are general rules that will guide your choice in the right direction, very often it is much better to just give it a try. We have seen that the different implementations of the parallel loops come with a bunch of parameters that are not settable via the steering file, but you can pass them via the processor constructor.
This is not particularly handy if you want to explore the parameter space to identify the best performance corner. At the same time, we did not think it was a good idea to pollute each and every processor subclass with additional operational ActiveParameter in the steering file. But do not worry, MAFw is always here to help you, and we have found a nice way to ‘temporary’ include these parameters in your steering file without having to change your processor code. Just include this LoopTuningMixin mixin class in your processor subclass (before Processor) and the magic will happen.
When the mixin is used, the following parameters become available in the steering file:
loop_type(allowed values:for_loop,parallel_for_loop,parallel_for_loop_with_queue)max_workersqueue_sizequeue_batch_size
The intended workflow is to temporarily add the mixin to your processor class, tune the values in the steering file, and once you have found the optimal configuration remove the mixin and use the optimal values in the constructor. If you want, you can also leave the mixin in place, it won’t make any hurt.
The while loop execution
From a programming point of view, the for loop and the while loop execution are rather similar. Between the execution of the start and the finish method, the process is repeated for a certain number of times until a certain condition is met.
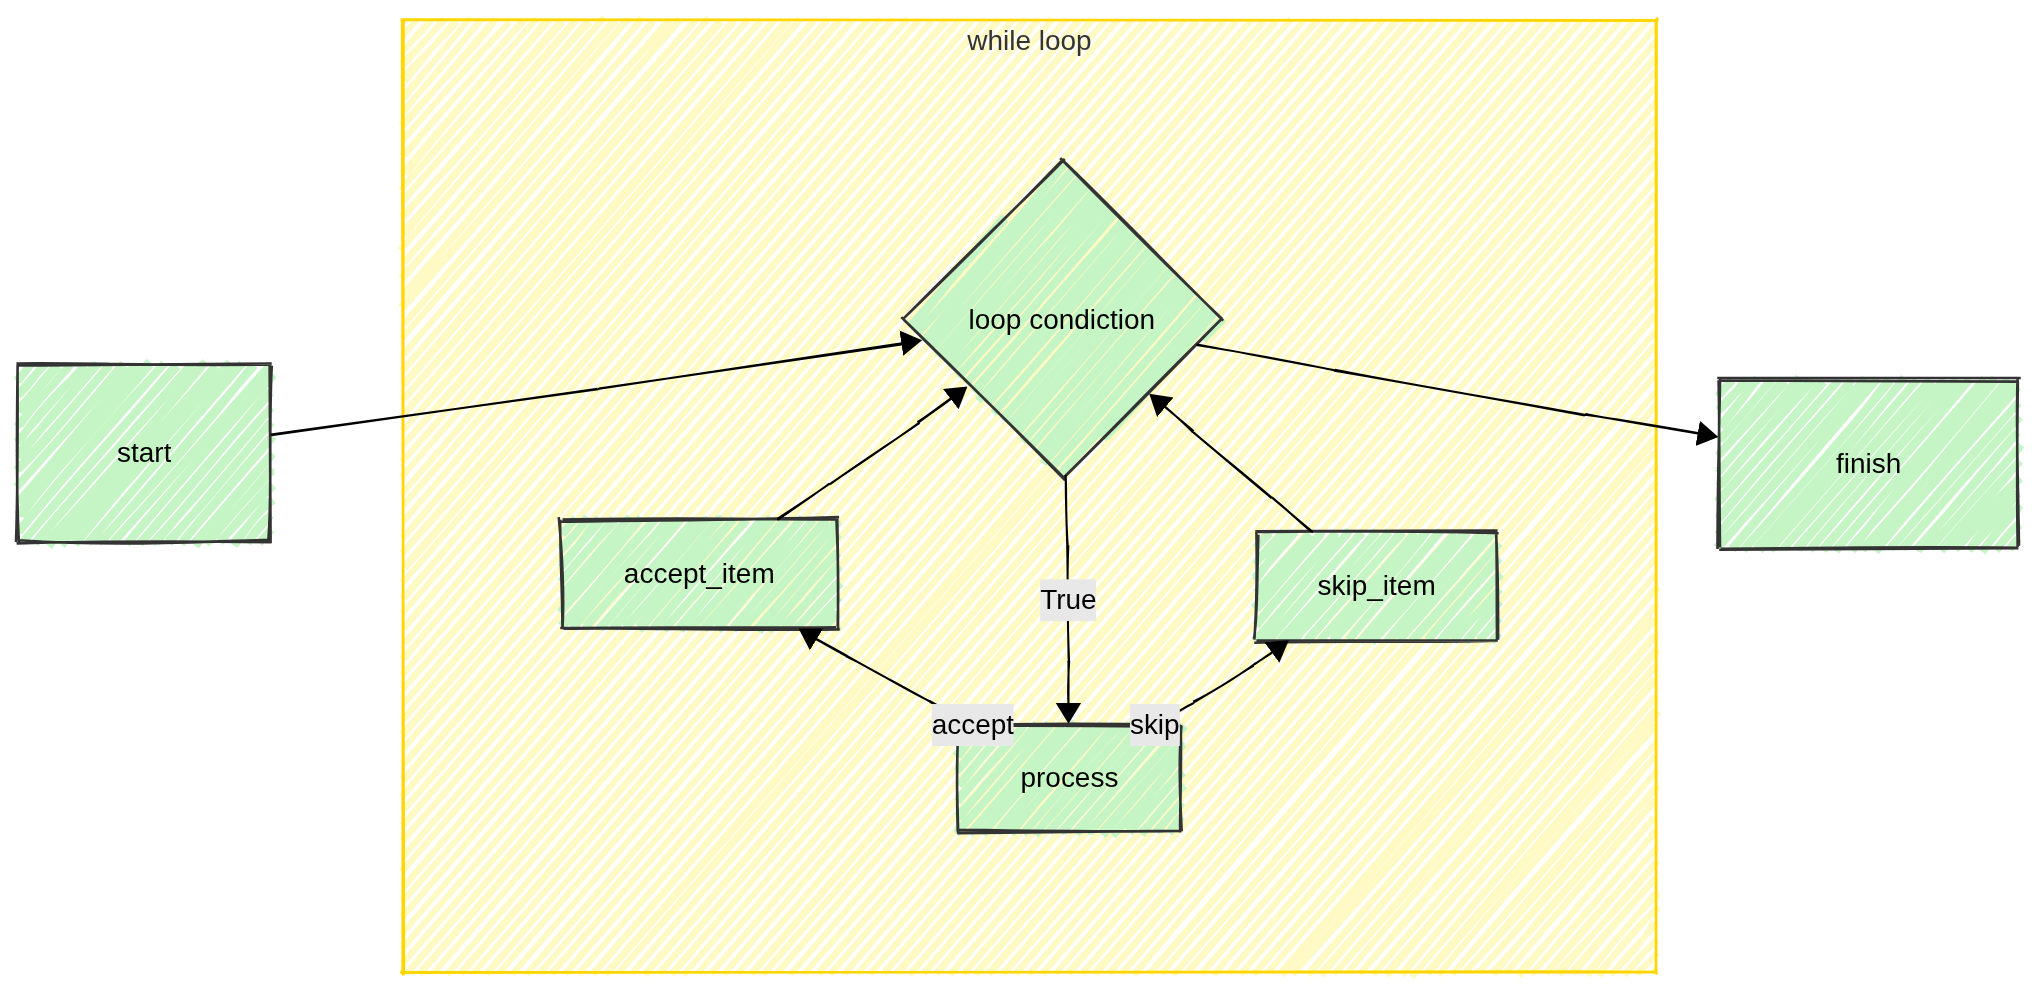
In this case, there is no list of items to loop over, but a condition that should be checked. Thus the user has to overload the while_condition() method to return a boolean value: True if the loop has to continue or False if it has to stop and go to the finish.
How to switch from one loop type to another
It is extremely simple to switch from one execution scheme to another. The Processor class takes the argument loop_type, just change this value in the processor init and the rest will come automatically.
Remember that, by default a processor is set to work with a for loop workflow, and thus you have to implement the get_items(). If you switch to while loop, then you need to implement while_condition() for the system to work.
The parallel for loop workflow still requires get_items(), but the loop type should be set to ParallelForLoop (or using the parallel_for_loop() decorator). The parallel for loop with queue workflow uses ParallelForLoopWithQueue and the parallel_for_loop_with_queue() decorator.
The last thing, you need to know is how to run a processor. First you create an instance of your processor, then you call the execute() method. There are other more practical ways, not involving any coding that we will discuss later on.
A comparison between the for loop and the while loop execution workflow is described in the example page.
Subclassing
The basic processor provided in the library does nothing specifically, it is only used as a skeleton for the execution. In order to perform some real analysis, the user has to subclass it and overload some methods. Having gained a clear understanding of the role of each steps in the execution workflow, read the list of methods that can be overloaded here below and then you are ready to see some simple Processor Examples.
List of methods to be overloaded
The process() method.
This is the central part of the processor, and it must contain all the calculations. If the processor is looping on a list of input items, the user can access the current item via the
itemattribute.
The start() method.
This is useful to prepare the condition to operate. For example, it is a good idea to open files and do all the preparatory work. In a looping processor, this method is called just before the cycle starts.
The finish() method.
This is useful to clean up after the work. For example, to save files, update DB tables and so on. In a looping processor this is performed just after the last iteration. Here is also the place where you can set the value of the
ProcessorExitStatus. This attribute is particularly relevant when several processors are executed in a daisy-chained manner. See more about this here and here.
Specifically for processors with a looping workflow, these methods need to be subclassed.
The get_items() method.
This is where the input collection of items is generated. Very likely this can be a list of files resulting from a glob or the rows of an input table or similar. This is required for all for loop type workflows (for_loop, parallel_for_loop and parallel_for_loop_with_queue) and must return an iterable object.
The while_condition() method.
This is the point at which the decision is made to either continue or terminate the loop. This is required only for while_loop processors and must return a boolean value.
The accept_item() and skip_item() methods (optional).
The execution of the for loop can be slightly modified using the
LoopingStatus(see this example). If the current iteration was successful, then the user can decide to perform some actions, otherwise if the current iteration was failing, then some other actions can be taken.
The consumer_start(), consumer_process(), and
consumer_finish() methods (optional).
These hooks are specific to the parallel_for_loop_with_queue workflow and allow customization of the consumer thread that serializes post-processing. By default the consumer process delegates to
accept_item()andskip_item().
The format_progress_message() (optional).
During the process execution, your console may look frozen because your CPU is working out your analysis, thus it may be relevant to have every now and then an update on the progress. The
Processorwill automatically display regular messages via the logging system about the progress (more or less every 10% of the total number of items), but the message it is using is rather generic and does not contain any information about the current item.By overloading this method, you can include information about the current item and customize the content of the message. You can use
itemto refer to the current item being processed. Here below is an example:def format_progress_message(self): self.progress_message = f'{self.name} is processing {self.item}'Be aware that if your items are objects without a good __repr__ or string conversion, the output may be a little messy.
The validate_configuration() (optional).
If your processor has several parameters, it might be a good idea that the configuration provided by the user via
ActiveParameteris validated. For this purpose the user can subclass thevalidate_configuration()method, where the validation of the configuration should silently take place. If the configuration is invalid, then the method should raise aInvalidConfigurationError. You will read more on processor parameters and how to use it in one of the next section.
Customize and document you processor
You are a scientist, we know, the only text you like to write is the manuscript with your last research results. Nevertheless, documenting your code, in particular your processor is a very helpful approach. We strongly recommend to use docstring to give a description of what a processor does. If you do so, you will get a surprise when you will generate your first steering file.
It is also a very good practice to provide help/doc information to your parameters using the help_doc argument of the ActiveParameter. If you do so, your first steering file will be much more readable.
One more point, each Processor has a class attribute named description, this is a short string that is used by some user interfaces (like RichInterface) to make the progress bars more meaningful.
Processor parameters
One super power of MAFw is its capability to re-use code, that means less work, less bugs and more efficiency.
In order to boost code re-usability, one should implement Processor accomplishing one single task and possibly doing it with a lot of general freedom. If you have a processor to calculate the Threshold of B/W images and you have hard coded the threshold algorithm and tomorrow you decide to give a try to another algorithm, then you have to recode a processor that actually already exists.
The solution is to have processor parameters, kind of variables that can be changed in order to make your processor more general and more useful. A note of caution, if you opt for too many parameters, then it may become too difficult to configure your processor. As always, the optimal solution often lies in finding a balance.
You can have parameters implemented in the processor subclass as normal attributes, but then you would need to modify the code in order to change them and this is far from being practical. You can have them as specific variables passed to the processor init, but then you would need to code the command line script to pass this value or to implement a way to read a configuration file.
MAFw has already done all this for you as long as you use the right way to declare processor parameters.
Let us start with a bit of code.
class MyProcessor(Processor):
    """
    This is my wonderful processor.

    It needs to know the folder where the input files are stored.
    Let us put this in a processor parameter.

    :param input_folder: The input folder.
    """
    input_folder = ActiveParameter(name='input_folder', default=Path.cwd(),
                                   help_doc='This is the input folder for the file')

    def __init__(self, *args, **kwargs):
        super().__init(*args, **kwargs)

        # change the input folder to something else
        self.input_folder = Path(r'D:\data')

        # get the value of the parameter
        print(self.input_folder)
Some important notes: input_folder is defined as a class attribute rather then as an instance attribute, it is to say it is outside the init method. This must always be the case for processor parameters. The fact that the variable and the parameter names are the same is not compulsory, but why do you want to make your life more complicated!
We have declared input_folder as an ActiveParameter, but if you put a break point in the code execution and you inspect the type of self.input_folder you will see that it is a Path object. This is because ActiveParameter is a descriptor, a very pythonic way to have a double interface for one single variable.
If your processor is subclassing the __init__ method, then never forget to include right at the beginning a call to its super, this is ensuring that the processor, and its parameters, are properly initialized and ready to be used.
What’s behind an ActiveParameter
Note
This is a very technical paragraph, you can skip it if you are not interested in the behind the scene of processor parameters.
Have a look at the code in the previous snippet. When you define input_folder, you use up to four parameters in the ActiveParameter init, but if you try to access those attributes from input_folder you will get an error message, because class Path does not have the attributes you are looking for. Where are then those values gone?
When you create an ActiveParameter, there is a lot of work behind the scene: each processor instance has a dictionary (Processor._processor_parameters) where the parameter name is used as a key and the corresponding value is an instance of PassiveParameter. This helper class has a very similar structure as the active counter part and it is used to store the current value of the parameter and all its metadata (default value and help string) defined when the active parameter was created.
The set and get dunder methods of the input_file are overloaded to operate directly on the private interface, more or less in the same way like when you define property setter and getter, but here it is done all automatically.
If you want to access the private interface, you can still do it. You can always use the processor get_parameter() using the parameter name as a key, to retrieve the PassiveParameter instance. Theoretically you can even set the value of the parameter using the private interface (set_parameter_value()), but this is equivalent to set it via the public interface directly.
Let us summarize all this with an example:
from mafw.processor import Processor, ActiveParameter

class MyFavProcessor(Processor):
    useful_param = ActiveParameter('useful_param', default=0, help_doc='Important parameter')

# create your processor, initialize the parameter with a keyword argument.
my_fav = MyFavProcessor(useful_param=10)

# print the value of useful_param in all possible ways
print(my_fav.useful_param)
print(my_fav.get_parameter('useful_param').value)

# change the value of useful_param in all possible ways
my_fav.useful_param += 1
my_fav.get_parameter('useful_param').value += 1

print(my_fav.useful_param)

# access other fields of the parameter
print(my_fav.get_parameter('useful_param').doc)
This is the output that will be generated:
10
10
12
Important parameter
Parameter configuration
We have seen how to add flexibility to a processor including parameters, but how do you configure the parameters?
You have probably noticed that ActiveParameter has the possibility to pass a default value, that is a very good practice, especially for very advanced parameters that will remain untouched most of the time.
If you want to set a value for a parameter, the easiest way is via the processor __init__ method. The basic Processor accepts any number of keyword arguments that can be used exactly for this purpose. Just add a keyword argument named after the parameter and the processor will take care of the rest.
Have a look at the example below covering both the case of Active and Passive parameters:
 1class MyProcessor(Processor):
 2    active_param = ActiveParameter('value', default=0, help_doc='An active parameter')
 3    active_string = ActiveParameter('string', default=0, help_doc='An active parameter')
 4
 5my_p = MyProcessor(value=100, string='a better string', looper='single')
 6
 7print(my_p.active_param)  # we get 100
 8assert my_p.active_param == 100
 9
10print(my_p.active_string)  # we get 'a better string'
11assert my_p.active_string == 'a better string'
Note that the best way is to avoid to explicitly include the parameter names in the init signature. They will be collected anyhow through keyword arguments and registered automatically.
The second approach is to use a configuration object, it is to say a dictionary containing all the parameters key and value pairs. This is particularly handy when using a configuration file. Exactly for this reason, the configuration object can have one of the two following structures. In both cases the configuration object has to be passed to the class using the keyword config
 1@single_loop
 2class ConfigProcessor(Processor):
 3    p1 = ActiveParameter('param1', default='value')
 4    p2 = ActiveParameter('param2', default='value')
 5
 6
 7cp = ConfigProcessor(config=dict(param1='new_value', param2='better_value', param3='do not exists'))
 8assert cp.p1 == 'new_value'
 9assert cp.p2 == 'better_value'
10dumped_config = cp.dump_parameter_configuration(option=2)
11assert dumped_config == dict(param1='new_value', param2='better_value')
12
13config = {'ConfigProcessor': {'param1': '1st', 'param2': '2nd'}}
14cp = ConfigProcessor(config=config)
15assert cp.p1 == '1st'
16assert cp.p2 == '2nd'
17dumped_config = cp.dump_parameter_configuration()
18assert config == dumped_config
Note
Migration from MAFw v1 to v2
If you were using MAFw already in its early day of version 1, you might remember that users could also use PassiveParameter directly as processor parameters. They had the disadvantage of requiring the dot notation (.value) to access the data member, but everything else was identical to an ActiveParameter. This was a consequence of the implementation of the old parameter initialisation. This procedure has been totally reviewed in version 2 and now there is no need anymore to use PassiveParameter. On the contrary, the user is recommended not to use PassiveParameter, but only their active counterpart.
Static parameter schema
When tooling such as GUI builders or template generators needs access to processor parameter metadata, the parameter_schema() classmethod exposes a serialisable list of ParameterSchema objects. Each schema entry includes the parameter name, resolved annotation, default, help string and booleans that flag list/dict expectations.
Because the schema derives solely from the ActiveParameter descriptors it does not instantiate any processor, enabling safe inspection of available parameters. The steering-file generator
generate_steering_file() already consumes this API to build templates without creating processor objects.
from mafw.processor import Processor, ActiveParameter
from mafw.models.parameter_schema import ParameterSchema

class MyProcessor(Processor):
    option = ActiveParameter('option', default=1, help_doc='Set the option for tests')

schema: list[ParameterSchema] = MyProcessor.parameter_schema()
for entry in schema:
    print(entry.name, entry.default, entry.help)
The schema list always mirrors the order in which the ActiveParameter instances were defined (parents first, followed by subclass additions), and overrides replace the inherited entry without changing its relative position. This deterministic registry keeps configuration generators, steering templates, and GUIs in sync with the developer-defined order.
Saving parameter configuration
We have seen that we can configure processor using a dictionary with parameter / value pairs. This is very handy, because we can load toml file with the configuration to be used for all the processors we want to execute.
We don’t want you to write toml file by hand, for this we have a function dump_processor_parameters_to_toml() that will generate an output file with all the parameter values.
But which value is stored? The default or the actual one? Good question! The actual answer is: it depends!
Let us have a look at the following example.
from mafw.processor import ActiveParameter, PassiveParameter

class ActiveParameterProcessor(Processor):
    """A processor with one active parameter."""

    active_param = ActiveParameter('active_param', default=-1,
                                   help_doc='An active parameter with default value -1')


class AnotherActiveParameterProcessor(Processor):
    """Another processor with one active parameter."""

    active_param = ActiveParameter('active_param', default=-1,
                                   help_doc='An active parameter with default value -1')
We have defined two different processors with one parameter each.
Now let us have a look at what happens when we attempt to dump the configuration of these processors.
processor_list = [ActiveParameterProcessor, AnotherActiveParameterProcessor]

dump_processor_parameters_to_toml(processor_list, 'test1.toml')
We have not created any instances of the two processors, and the processor_list consists of two classes. When passed to the dump_processor_parameters_to_toml() function, no processors are instantiated. The helper reads each class’s parameter_schema(), so it can fetch the declared default, the help text and other metadata without executing the constructor.
Because the schema copies the defaults from the original ActiveParameter, the dumped value for every parameter is the declared default when no initial value is provided in the descriptor.
The output of the first example will show the two processors with their parameters listed and connected to their default values.
[ActiveParameterProcessor] # A processor with one active parameter.
active_param = -1 # An active parameter with default value -1

[AnotherActiveParameterProcessor] # Another processor with one active parameter.
active_param = -1 # An active parameter with default value -1
Now, let us take a step forward and add a bit more complexity to the situation. See the next snippet:
# create an instance of ActiveParameterProcessor with a specific value of the parameter
# but we will include the class in the processor list.
active_processor_instance = ActiveParameterProcessor(active_param=100)

# create an instance of AnotherActiveParameterProcessor with a specific value of the parameter
# and we will submit the instance
another_active_processor_instance = AnotherActiveParameterProcessor(active_param=101)


processor_list = [
    ActiveParameterProcessor,  # a class
    another_active_processor_instance,  # an instance
]
dump_processor_parameters_to_toml(processor_list, 'test2.toml')
This time we have a mixed list, the first item is still a class, so the helper will reuse the static schema to obtain the default -1 and no constructor is invoked. For the second entry we are passing an actual instance, so the dumped value reflects the runtime value 101 set when the instance was created.
Here is the produced configuration file:
[ActiveParameterProcessor] # A processor with one active parameter.
active_param = -1 # An active parameter with default value -1

[AnotherActiveParameterProcessor] # Another processor with one active parameter.
active_param = 101 # An active parameter with default value -1
Ultimately, the values that will be output depends on the fact if you pass an instance of the processor or its class. But in the end, this is not really important because the user should dump TOML configuration files as a sort of template to be checked, modified and adapted by the user for a specific run.
Parameter and processor inheritance
Parameters, like any other class attributes and methods, can be inherited via subclassing and this can turn out to be very useful. Imagine to have a full class of processors having some parameters in common (the most simple example is the base path for the produced output), then the user might consider to have an intermediate subclass between MAFw Processor and their final Processors defining all these common parameters.
Have a look at the example below:
@single_loop
class BaseProcessor(Processor):
    my_param = ActiveParameter('my_param', default=5, help_doc='An integer value')

class SameDefaultProcessor(BaseProcessor):
    pass

class OtherDefaultProcessor(BaseProcessor):
    new_defaults = {'my_param': 885}

dump_processor_parameters_to_toml([BaseProcessor, SameDefaultProcessor, OtherDefaultProcessor], 'test.toml')
All processors have a parameter names my_param. Since the parameter has been defined only once (in the base processor), it is born with the same default value for all subclasses. But this can be changed setting the processor instance variable new_defaults as done in the OtherDefaultProcessor. In fact, the TOML configuration file is exactly showing this situation:
[BaseProcessor]
my_param = 5 # An integer value

[SameDefaultProcessor]
my_param = 5 # An integer value

[OtherDefaultProcessor]
my_param = 885 # An integer value
Parameter names
The name of a parameter must be a valid Python identifier and there are a bunch of names that are reserved for internal use. The validity of a parameter name is automatically checked, so you will not be able to mess up the system.
Parameter typing
When creating an Active parameter, you have the option to directly specify the parameter’s type using the typing template, but you can also do it, and probably in a simpler way assigning a reasonable default value. While this is not really important for numbers, it is extremely important if you want to interpret string as Path object.
If you declare the default value as a Path, for example Path.cwd(), then the string read from the configuration file will be automatically converted in a Path.
Note
If you intend to have a float parameter, use a decimal number, for example 0., as default, otherwise the interpreter will assume it is an integer and convert to int the parameter being read from the configuration file.
One more note about parameters. Theoretically speaking you could also have custom objects / classes as parameters, but this will become a problem when you will be loading the parameters from a TOML file. Actually two problems:
The TOML writer is not necessarily able to convert your custom type to a valid TOML type (number, string…). If your custom type has a relatively easy string representation then you can add an encoder to the TOML writer and teach it how to write your object. See for example the encoder for the Path object.
1def path_encoder(obj: Any) -> Item:
2    """Encoder for PathItem."""
3    if isinstance(obj, PosixPath):
4        return PathItem.from_raw(str(obj), type_=StringType.SLB, escape=False)
5    elif isinstance(obj, WindowsPath):
6        return PathItem.from_raw(str(obj), type_=StringType.SLL, escape=False)
7    else:
8        raise ConvertError
Even though you managed to write your class to the TOML steering file, you have now the problem of reading back the steering file information and build your custom type with that.
One way to overcome this limitation might be to write to the steering file the __repr__ of your custom class and at read back time to use eval to transform it back to your class. This below would be a more concrete implementation:
 1import tomlkit
 2from tomlkit.items import  String, Item, ConvertError
 3from tomlkit.toml_file import TOMLFile
 4
 5class MyClass:
 6    """A custom class to be used as a processor parameter"""
 7    def __init__(self, a, b):
 8        self.a = a
 9        self.b = b
10
11    def __repr__(self):
12        """IT MUST BE IMPLEMENTED"""
13        return f"{self.__class__.__name__}({self.a}, {self.b})"
14
15class MyClassItem(String):
16    """TOML item representing a MyClass"""
17    def unwrap(self) -> MyClass:
18        return MyClass(*super().unwrap())
19
20def my_class_encoder(obj: MyClassItem) -> Item:
21    """Encoder for MyClassItem."""
22    if isinstance(obj, MyClass):
23        # we write the class as a string using the class repr.
24        return MyClassItem.from_raw(repr(obj))
25    else:
26        raise ConvertError
27
28# register the encoder
29tomlkit.register_encoder(my_class_encoder)
30
31# ------------------
32# write to TOML file
33# ------------------
34
35my_class = MyClass(10,24)
36doc = tomlkit.document()
37doc.add('my_class', my_class)
38doc.add('simple_i', 15)
39
40with open('test.toml', 'w') as fd:
41    tomlkit.dump(doc, fd)
42
43# ------------------------
44# read back from TOML file
45# ------------------------
46
47doc = TOMLFile('test.toml').read()
48read_back_class = eval(doc['my_class'])
49try:
50    simple_i = eval(doc['simple_i'])
51except TypeError:
52    simple_i = doc['simple_i']
53
54assert isinstance(read_back_class, MyClass)
55assert read_back_class.a == my_class.a
56
57assert isinstance(simple_i, int)
58assert simple_i == 15
my_class = "MyClass(10, 24)"
simple_i = 15
This approach, even though possible, is rather risky, we all know how dangerous eval can be especially when using it directly with information coming from external files.
Furthermore, it is worth considering whether having a custom class as a parameter in a processor is truly necessary. Often, there are simpler and safer alternatives available.
What’s next
You reached the end of the first part. It means that by now you have understood what a processor is and how you can subclass the basic class to implement your analytical tasks, both with looping or single shot workflow. You learned a lot about parameters and how you can configure it.
The next section will be about chaining more processors one after the other using the ProcessorList.